
Mixing: hitting the first wall
I have been mixing a lot of different tracks from puremix, and started to stray from the video tutorials. Step-by-step video tutorials have a tendency to boost your confidence: you get good results despite having no real idea of what you are doing.
Deviating from the prescribed steps quickly made it clear that I don’t even have a reasonable idea of what sounds good in the first place. I don’t know if a mix is punchy or not, I don’t know if a snare sounds good in context of a beat or a whole song, I don’t know if the bass is loud enough compared to the kick. Part of that is that I don’t listen to this kind of music very often, part of that is me mistrusting my taste, and part of that is a lack of ear training and knowledge.
I am following the advice of some professional mix engineers on IRC, and try to make complete mixes of songs up front, before digging into the tutorials. This is excruciatingly hard, but probably the best way to make progress right now. I am still figuring out how to best assess my results, and one good way I found is to remix the same part in a variety of ways, rendering out the different results as I go along, and listening back to them later on, both on headphones with waves NX, on headphones without waves NX, on laptop speakers and on my home speakers. I realize that all three indicate different things in the mix. It is very easy to be fooled on the headphones.
I am also doing “mixes” of maschine songs. The disheartening part about this is that usually, my mix is worse than the original “straight out of maschine” mix. I hear things I don’t like about the maschine mix, but I am unable to improve it without losing the “soul” of the piece. The good thing about realizing this is that I have the exact same problem when I try to polish / finish my own songs.
Andrew Scheps, DAW templates and parallel processing
After hitting that little wall with remixing the maschine stems, I went back to puremix in order to do something “gratifying”, as in watching a video and then redoing a mix. By that time, a new video had been posted: Andrew Scheps and his DAW mixing template.
While Andrew Scheps’ template is quite confused and messy, at least for my taste, it gave me some interesting insight into what a template is. Obviously, it is a set of tracks and busses and effects already set up, so that a session can be imported without having to set up a ton of routing. However, it also showed me that it can be the ever evolving container for certain approaches to shaping / mixing sound. For example, Scheps tends to have a crush bus for parallel compression on the drums, one on the bass, sometimes one to gel the bass and the drums together, one bus to parallel compress all the instruments except bass and drums. These busses and the compressors on them will change over time, with one being phased out in favor of another. Some busses might end up not being used in a session, but they are there if needed.
Other examples of already set up “patterns” are a chorus, exciter, slap delay and parallel compression bus for the vocals, a different set of reverbs / gated reverbs / compressed reverbs for instruments such as guitars and keys, and of course a master chain for the stereo buss.
S1 session layout
I decided to spend some time setting up a S1 template using some of the approaches that Scheps is using: a lot of parallel compression, a rear buss for all instruments except drums and bass, more parallel compression, and exciters for background and main vocals.
I also used something similar to the naming convention shown to me by a mixing engineer on IRC.
I have busses for all main groups of instruments: [DRUMS] for drums,
[BASS] for bass, [PERC] for percussion, [GUITARS] for guitars,
etc… These busses contain both the instrument group, and all the
sends that might be involved. All these busses go into a [MAIN]
bus.
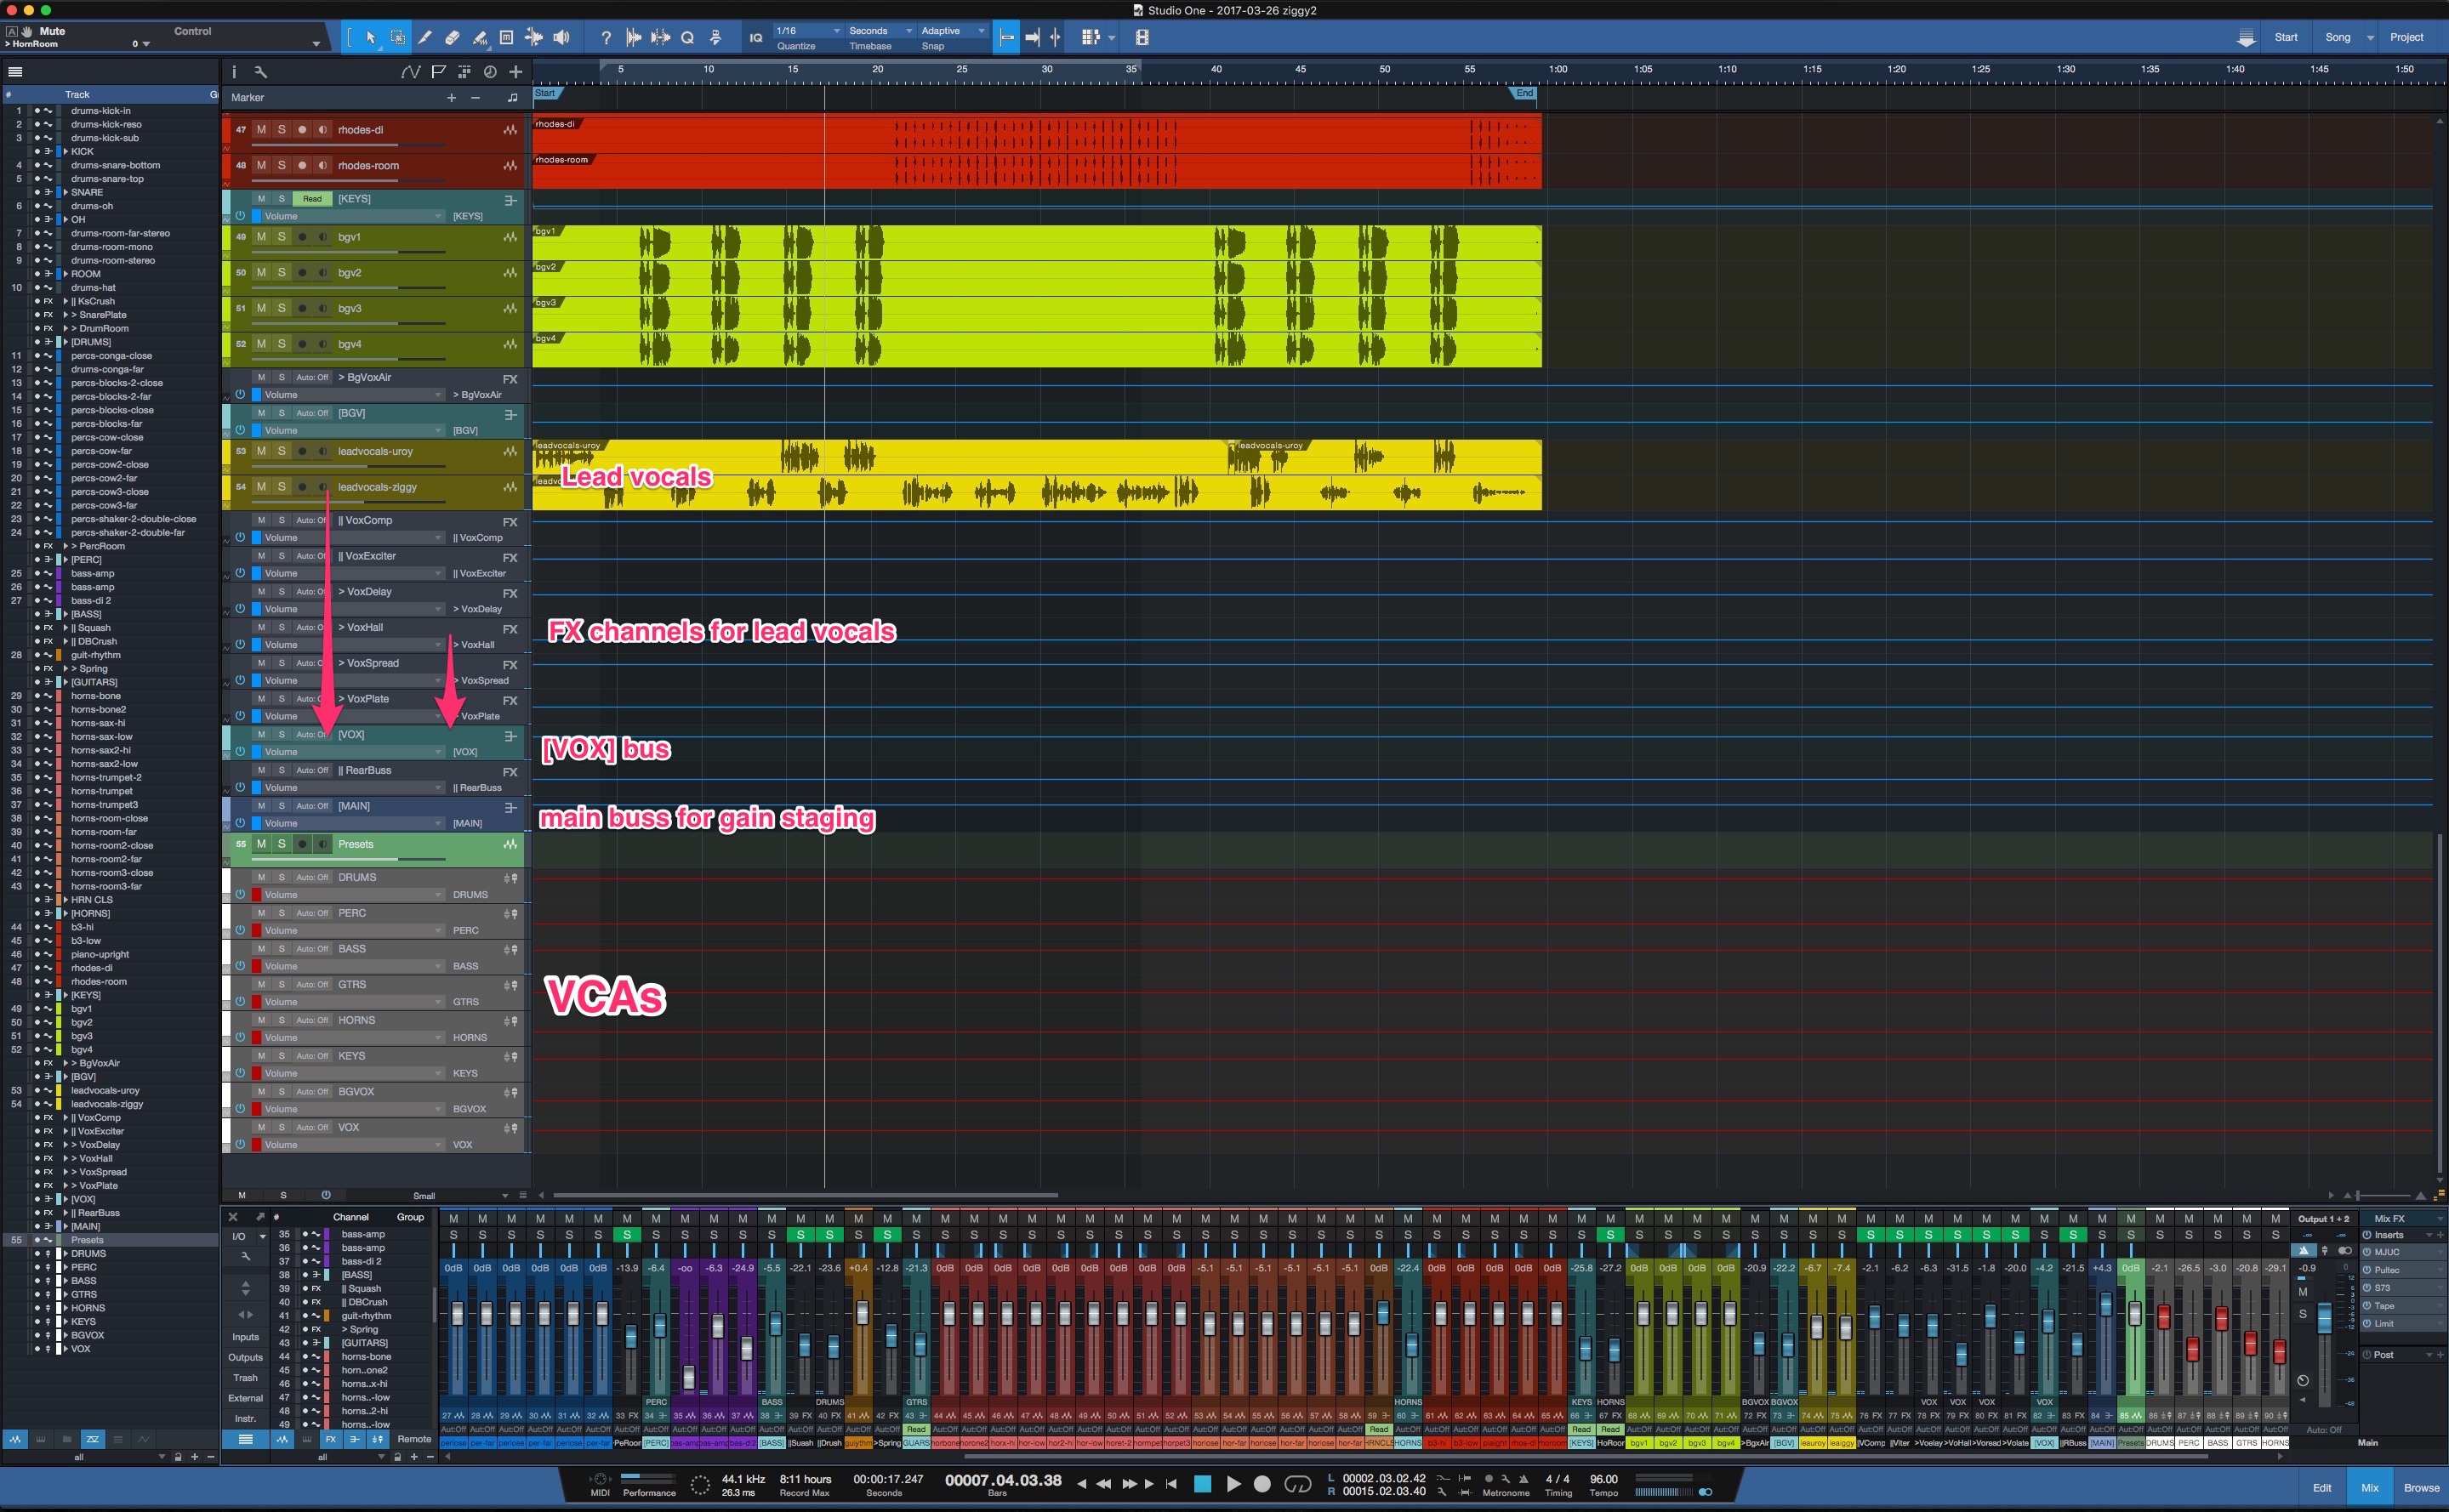
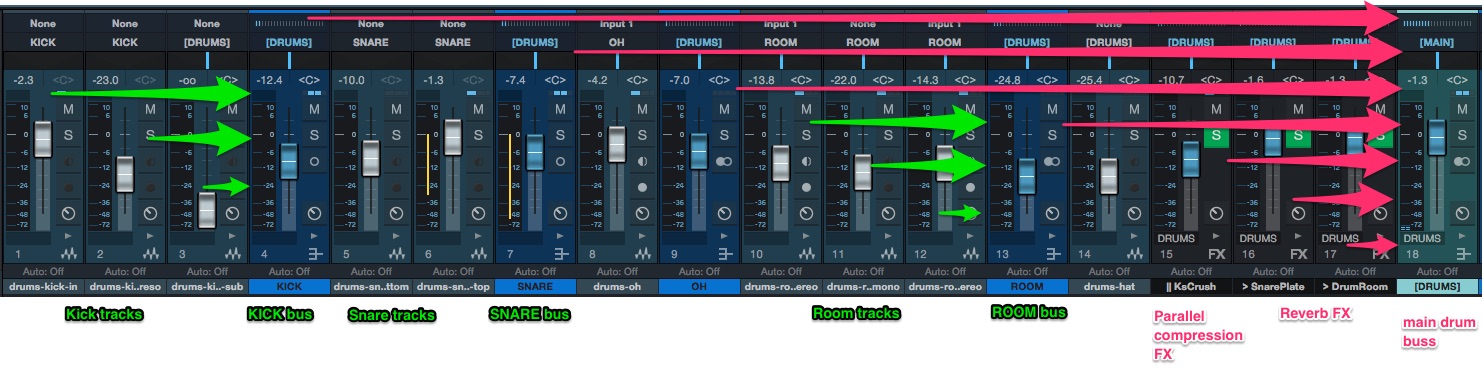
For example, [DRUM] busses all the
drums, as well as the drum reverbs and the parallel compression. In
this case, I will have sub-busses called KICK, SNARE, HATS,
ROOM to bus the individual components. These are placed left of the
main [DRUMS] bus. Individual tracks are placed left of their
respective bus, and FX sends going into a group bus are placed to the
right. Parallel compression / exciter sends are labelled || KsCrush
(camelcase), while reverbs and delays are labelled > DrumRoom.
The reason for routing the FX channels into the individual
subgroups is that it allows me to control a whole group of instruments
with one fader, without having to worry about individual send levels
if the FX tracks where to be routed directly into the [MAIN] bus.
The purpose of the [MAIN] bus is to give me an immediate visual
feedback about the gain staging going into the final effects chain on
the stereo buss. I can quickly adjust so that the master compressors
get hit in their butter zone.
On top of that, I have a separate VCA fader for each bus itself, which are all grouped on the right of the mixer. This allows me to quickly control all groups independent of what actual group I am currently working on.
I heavily use mixer view snapshots. I have one that shows all the tracks, which I use only in rare cases, and then one per instrument group, so that I can focus on a few tracks in particular. However, I always have the VCAs on the right allowing me to adjust the overall balance and the gain staging into the output buss.

The colors I use are just the predefined S1 colours, using the bottom row for drums and then going upward, in the order drums, percussion, bass, guitars, keys, horns, background vocals, vocals.
This has been an instructive undertaking. Boiling everything down to a fixed structure with fixed naming gives the session a lot of clarity. I love how certain patterns (say, the rearbuss idea that Scheps uses) can be encoded into a template, and then used or not depending on the project.
Mixing fly rasta in S1
I went back around and rewatched some puremix videos I watched at the beginning. One of them was the song “Fly Rasta” mixed by Andrew Scheps. Andrew Scheps is one of the more entertaining mixing engineers to watch on video. He is known for Red Hot Chili Peppers, Metallica, Michael Jackson, and more infamously for his fairly intense use of parallel compression. While the video is about mixing in the box, there is an alternative video where Scheps mixes the same track on his analogue setup. The console and hardware units layout is where most of his mixing concepts come from, and he translated them to similar structures in the DAW.
He uses a few compressors, an aphex exciter and an eventide chorus as rack units, and has them “permanently” frozen on a fixed settings. They are accessible on send channels from the main console. Similarly, in the box, Scheps has a couple of compressors / choruses / reverbs / exciters in send busses, and rarely if ever looks at their settings. This is an interesting approach, as it makes you use your ears when setting the send levels, and not worry about setting values, or seeing the plugin UI (which I find to be very influencing).
One parallel compression bus Scheps uses is what he calls the “rear buss” (it is the back bus on his analogue console). It is a heavily compressed bus to which every instrument is sent, except the drums and the bass. This gels the whole “topping” (if you consider bass and drums to be the foundation) in one thick paste that is applied on top, while keeping the mix dynamic enough.
Also interesting is his near lack of EQ on vocals, and most instruments for that matter. Bass and air are reinforced by fairly broad strokes of pultec or scheps 73 EQs, while mid range and highs are added to vocals using parallel exciters. Although to be fair, the stems to be mixed are already very clean, and have been prefiltered and balanced, a lot of them are really just ready to be dropped in (keys and horns for example).
While I am not too big a fan of the very compressed, in your face smack style of Andrew Scheps (which really fits music like the RHCP), I found it very refreshing to see someone focus so much on the ears and the music, instead of smaller technicalities.
After watching the video and making a few notes about the routing concepts he uses, I decided to go into S1 and emulate his approach. I used a solid mixture of MJUC, DC8C2, SuperCharger GT and the native instruments VC compressors, along with the enhanced EQ by NI and Scheps73, and u-he Satin for tape saturation, and gave it a go. It was my most enjoyable mix so far, and I only felt I was struggling with fitting in the bass for a while. It ended up being much heavier in my mix than in Andrew Scheps final mix, but I must admit that I quite like it this way. The whole mix has almost no EQs, and I almost never tweaked plugin settings very much beyond dialing in a specific sound at the beginning (or choosing a preset).
This is probably me just letting go of the “technical” side of things that I have been focusing on, relaxing a bit and going with the sound and flow, rather than focusing on tweaking minute details and learning to hear them.